
When a new animator gets started it can be an overwhelming process just to learn the terminology. Experienced animators can sometimes forget how confusing and difficult it can be for beginners to wrap their heads around all the animation tools in just one package like iClone, and this doesn’t include POST work.
With this in mind I was recently reminded that not everyone sees how easy it can be to grasp the animation basics of simple tasks like moving an object across the screen. A lot of new animators haven’t even heard of keyframes or a timeline so it can be a very frustrating experience at first. In this article I will cover a few basic concepts with some short tutorials to demonstrate the various processes.
Prop animation can be just as important as character animation in terms of what it can add to a scene. A multi-object or skinned prop can be animated on the timeline with keyframes. In case you are completely new to animation, keyframes capture the state of the prop or character based on its transform-attributes like location, rotation and several other factors. While iClone does most of the work behind the scenes we still need to be familiar with a few basics.
Type of Mesh – Static or Animated
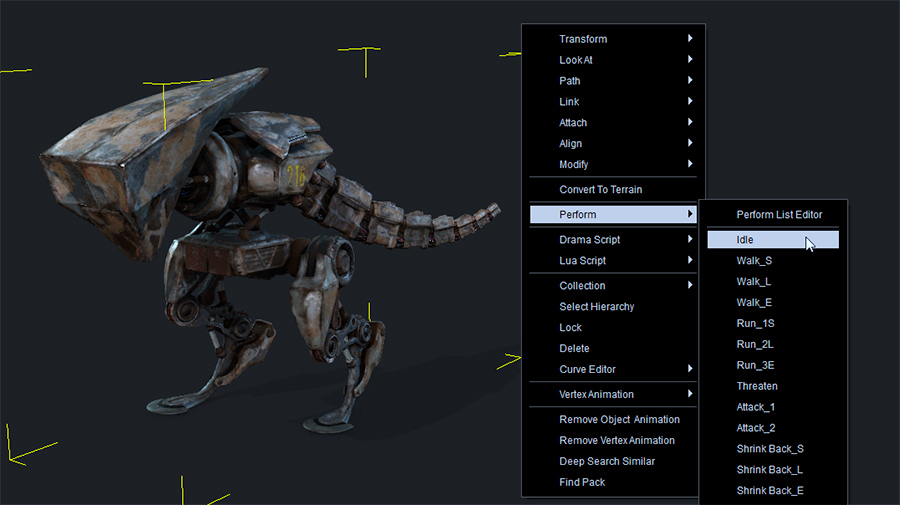
This is simple. If you right-click and there are no Perform Menu actions, then it is static. This doesn’t mean it can’t be animated. It just means it has no built-in motions. We can still animate it as a whole or in parts if those parts are separated or skinned to some sort of skeleton we can manipulate with the Animate Prop tools. Almost anything can be animated on at least the X, Y, and Z axis in most cases.
Why is Everything Moving?
It’s happened to a lot of us, including yours truly, and still does from time to time. What I’m talking about is when you add a prop or number of props to the scene and then you play it back… some or all of the props will seem to disappear or move back to the point of import or origin, then slide over into place when as the scene plays.
What happened was simple and can become an annoying and irritating habit. In this scenario, when we added the new prop or props, we did not return the playhead to the start of the timeline. This creates a motion that starts at frame one even on static props. The prop then slides across the scene to the point where you placed it as the animation plays out.
The simplest way to stop this is to RETURN THE PLAYHEAD TO THE START OF THE TIMELINE BEFORE ADDING ANY PROPS.
There is also an easy way to remove this unwanted and inadvertent motion by moving the playhead down the timeline to a point where everything is in its proper place then selecting the affected props and right clicking to choose Remove Object Animation.
Keyframes
This topic cannot be covered enough until you completely understand the concept. We can consider keyframes to be markers that show us where we made changes to a prop’s location, orientation or other attributes. It not only marks the location on the timeline it also provides a visual aid for us to know where to make edits or insert new edits.
I also want to familiarize you with the basics of Curve Presets before we get into moving long distances with a prop. Curves can be considered a more middle to advanced tool but the curve presets are already set up and can be utilized very easily by beginners even if you still don’t grasp what a curve is. Below is a quick primer on using Curve Presets to add more than just steady movement. It will demonstrate how we can get various effects from just applying the presets to the existing keyframes. If you are more adventurous then you can try out the Curve Editor but it is not a beginners level tool. Here is a link to the Curve Editor: Getting Started tutorial in iClone 7 when it was introduced. It wouldn’t hurt to take a look at that tutorial as not every beginner struggles with the curve editor.
In the case of moving a prop from Point A to Point B, we need to make sure there is a keyframe at the BEGINNING and ENDING of the movement. This will make the prop move along until it reaches the ending keyframe.
To accomplish this, we use the basics of movement:
- set a keyframe (if there already isn’t one) where the box is located at the START of the movement.
- Move down the timeline whatever number of frames are required, then move the box to the desired location. This will set up a motion between the keyframes generated by iClone that move between the starting and ending keyframes. In the early days of animation these were called tweens as they filled in all the frames “in-between”.
- We can speed up the motion by SHORTENING the distance between keyframes, transversely we can slow down the movement by LENGTHENING the distance between keyframes.
One practical example of this is something like a Sci-Fi speeder racing across the desert. It’s a very simple animation with no moving parts on the speeder.
Pivot is Very Important
The importance of the pivot location cannot be stressed enough. If, for example, you want a door to swing open and closed but the pivot is in middle then the door will revolve around that pivot instead of the proper side of the door. We can edit the pivot with the Pivot section of the Modify menu.
There is a preset diagram of pivot points we can click on for front, middle or back in nine directions. This will place the pivot point in the chosen location within those parameters. We can also edit the pivot manually with the Edit Pivot button in the same Pivot panel of the Modify menu. This will activate a 3D-Gizmo to move the pivot to your desired location.
Saving Custom Perform Motion
We can also add our own custom motions with the ability to edit the menu when needed. There is a line on the Timeline for collecting and saving our motions. As mentioned earlier there is (with the prop selected) a right-click Perform menu that controls any built-in motions and allows us to use our own custom motions. If there are any motions listed in the right-click Perform menu then the prop already has some motion embedded and we need only to click on one of those motions to add them to the prop. To add our own custom motion take a look at the short video below demonstrating how we use the Collect Clip feature on the timeline to collect and save the motion either to the Perform Menu or other locations.
Props on a Path
Paths are another essential tool for beginners to get an object to move from Point A to Point B. They work with all sorts of props like cars, hot air balloons, even characters but a path is particularly good with aircraft and objects like our Speeder hovercraft.
We can easily create a path by point and clicking in the workspace to place path points. We can manipulate these path points in terms of space between them, rotation and other orientations.
In its simplest form we start on frame 1 with the object attached to the first path point then we move down the timeline however many frames are desired or to the end and use the same Path eyedropper tool to select the path point. From here the path will fill in with a visual reference for easy scrutiny or editing.
Scaling a Prop in Real Time
Another simple effect that beginners can use right away for fast animation is scaling to change the scale of the prop in one or the other axes. We can make a prop larger, smaller, flatter, wider and taller. When you set a keyframe at both ends of the animation we can capture the scaling in real time as the video plays out.
Animating Prop Diffuse Color
This is an often-overlooked feature when learning iClone. The Diffuse Color can be keyframed and anytime an attribute can be keyframed it can be animated. In the case of the Diffuse Color, it means the colors blend over time to change from one color to another.
Visibility
This is yet another easy-to-use setting that can toggle visibility of the entire object on or off. It works the same as the previous tutorials except we will use visibility under Display – Visible in the Display menu of the modify tab.
Summary
While we have covered many attributes of animating a prop, in reality we have only scratched the surface of what can be done. These are the very basics of keyframe and timeline-based animation. I have used very basic scenarios to keep things simple and straightforward, but these techniques apply to almost all props.
We have covered how to keyframe the movement of an object, embed the custom animation and save it for future use. We haven’t covered all attributes, but we can do that at another time as this should be plenty to consider when you are just starting out.
I realize there is a lot to take in when setting out on this animation journey and like any other occupation or hobby it takes time, patience and practice. Don’t start with complicated scenes. Animate simple projects like the ones in this article and you will start to come to grips with what we can do with a powerful animation tool like iClone.
We haven’t covered Prop Puppeteering as that will take an entire article by itself, and these basics can be put it immediate use by beginners. Also keep in mind that the hyperjump example was far from the most sophisticated jump-in but it serves the purpose of learning while providing something that can actually be used. Give it a try, then improve it. You might be surprised at what you’ve learned.
Manual
Creating A Perform List

MD McCallum – WarLord
Digital Artist MD “Mike” McCallum, aka WarLord, is a longtime iClone user. Having authored free tutorials for iClone in its early years and selected to write the iClone Beginners Guide from Packt Publishing in 2011, he was fortunate enough to meet and exchange tricks and tips with users from all over the world and loves to share this information with other users. He has authored hundreds of articles on iClone and digital art in general while reviewing some of the most popular software and hardware in the world. He has been published in many of the leading 3D online and print magazines while staying true to his biggest passion, 3D animation. For more information click here.


